
HDB toilet renovation waterproofing: Avoid mistakes and meet HDB rules

A toilet kerb can help contain water, but it does not replace careful waterproofing. For toilet renovation in commercial premises, plan for the floor, wall junctions and shower zone, and consider the bathroom layout when deciding whether a kerb is needed. Where work involves an HDB property, a water test may be required after bathroom floor finishes are replaced; check the applicable instructions for the work.
It is reasonable to want a clear answer about the kerb before work begins. Getting the waterproofing details right also means understanding building management requirements, avoiding shortcuts that could leave weak points and knowing what to expect during testing.
This guide explains how to assess whether a kerb is needed, plan waterproofing work and avoid common mistakes. It also covers permit and building management considerations, preparing for a water test, and curing and checks before tiling starts. The aim is a practical toilet plan that meets applicable requirements and is clear before work begins.
Table of Contents
1. Planning, measurements and documentation
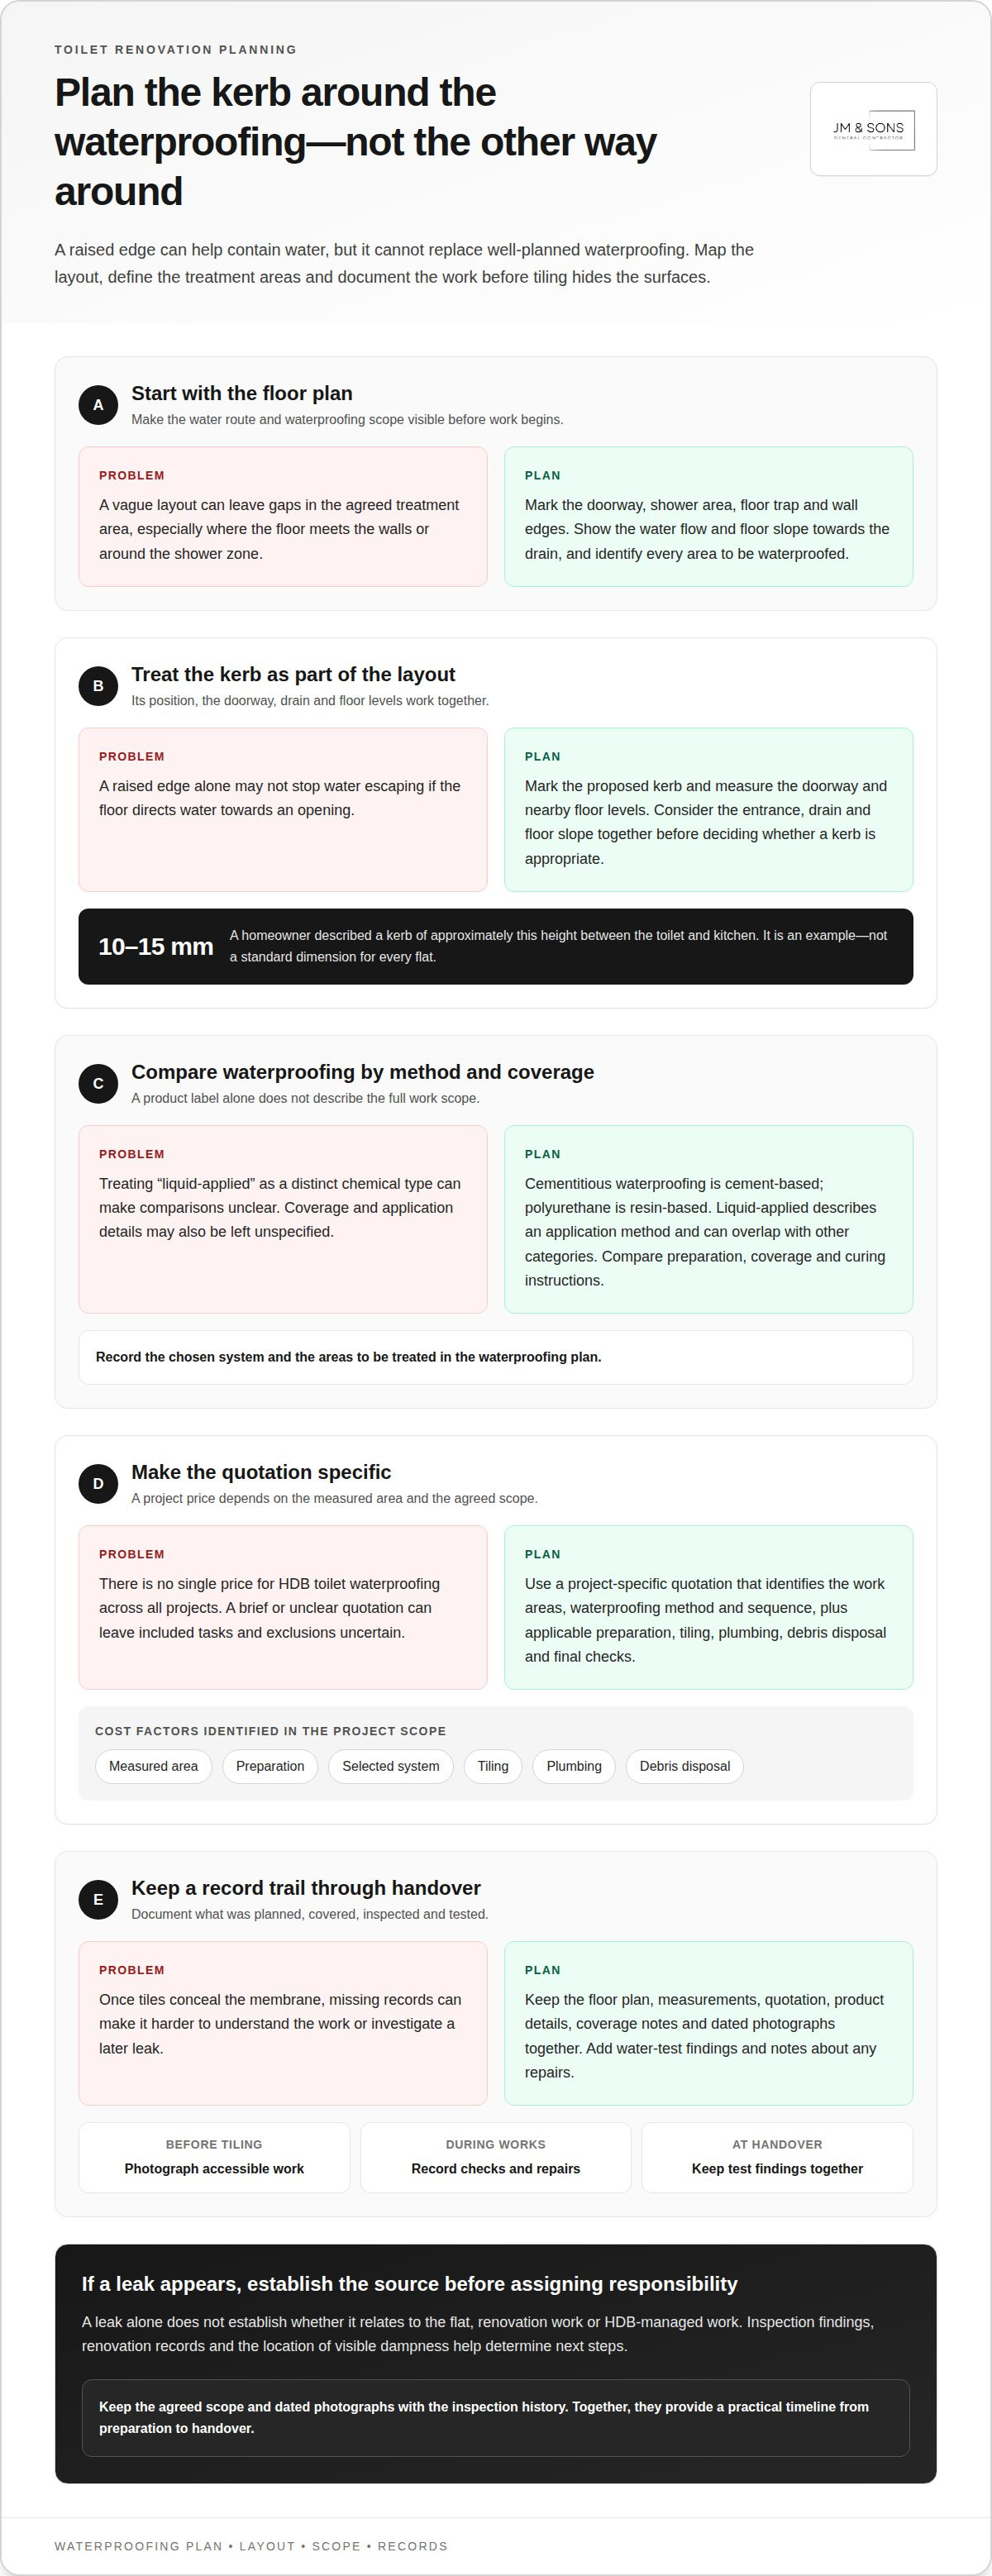
Start with a measured plan of the toilet, marking the doorway, shower area, floor trap and wall edges. Show how water flows and how the floor slopes towards the drain. A plan for HDB toilet renovation waterproofing should identify every area to be treated, including floor-to-wall junctions and the shower zone. This gives the renovation scope a clear starting point before tiling conceals the surfaces.
Mark the proposed kerb position and measure the doorway and floor levels around it. One homeowner described a kerb between the toilet and kitchen as approximately 10-15mm high. That is an example, not a standard dimension for every flat. Consider the kerb alongside the entrance, drain and floor slope. A raised edge alone cannot prevent water escape if the layout directs water towards an opening.
Cementitious waterproofing is cement-based, while polyurethane is resin-based. Liquid-applied describes an application method, not a single chemical type, so it can overlap with other categories. Compare the proposed systems by their coverage, preparation and curing instructions. Record the chosen system and treatment areas in the HDB toilet renovation waterproofing plan instead of relying on a product label alone.
Responsibility for a leak between HDB flats depends on its source and cause. A leak alone does not establish whether it is related to the flat, renovation work or HDB-managed work. Inspection findings, renovation records and the location of visible dampness help determine next steps. Keep the agreed work scope and dated photographs together in case a problem appears later.
There is no single price for HDB toilet waterproofing across all projects. Cost depends on the measured area, preparation, selected system and the scope of tiling, plumbing and debris disposal. A project-specific quotation should set out the applicable costs.
A useful renovation quotation clearly identifies what the agreed scope includes. It should state whether permit assistance, waterproofing, tiling, plumbing, debris disposal and final checks are covered. It should also describe the waterproofing areas, work sequence and checks before tiling. Clear itemisation helps distinguish included tasks from exclusions before renovation begins.
Keep the floor plan, measurements, quotation and waterproofing records together. Add product details, coverage notes and dated photographs taken before tiles conceal the membrane. Include water-test findings and notes about any repairs. These records create a practical timeline from preparation to handover. If a leak later needs investigation, the documented work and inspection history can help identify where to start.
2. Common commercial fit-out mistakes
A common mistake is treating a fit-out as a matter of finishes alone. Commercial work may also involve coordinating services, access and building management requirements. Confirm the work scope and approval process before work begins, and check relevant requirements with building management.
Floor levels can also become a false measure of accessibility. A 20mm threshold alone cannot show whether a route between work areas is practical. Consider doorways, floor levels and access needs together. For example, a raised edge may create an obstacle even if the surrounding floor is level.
Another mistake is leaving service connections and interfaces out of the work scope. A space may appear complete while electrical, mechanical or plumbing requirements have received less attention. Name these areas in the fit-out documents. During preparation, inspect visible service points and record their condition before finishes conceal them.
Rushing from installation to handover creates another risk. Work may need to be coordinated with inspections, testing and building management processes. Include these steps in the project sequence. A finished surface is not proof that connected systems have been checked or that outstanding work is complete.
Skipping checks before finishes conceal services is another avoidable mistake. Inspection and testing can help identify issues while affected areas remain accessible. Record the inspection date and observations, then photograph relevant areas where accessible. If a problem appears, pause the next stage and identify its source before closing up the area.
Finally, do not rely on a verbal promise about the work without clear records. A brief description alone does not explain the scope, materials, preparation or completion checks. Have the agreed method and work areas recorded in the project documents. A dated sequence of preparation, installation, inspection and testing makes each stage traceable and issues easier to investigate than an undocumented finish.
3. HDB renovation rules and permits
Check the type of work before setting a renovation date. HDB rules can differ for hacking, replacing finishes and installing an overlay. Newly built HDB flats have a three-year restriction period for removing original bathroom and toilet wall and floor finishes. This affects whether the planned work can begin as proposed. Identify the flat’s completion date and the original finishes before agreeing on hacking. If the restriction applies, don’t assume a waterproofing plan overrides it.
An adhesive-only overlay over one existing layer, up to 13mm thick, is described as not needing an HDB permit. That detail applies to the stated overlay conditions, not every tiling or waterproofing project. A second existing layer, hacking, or changes to plumbing can alter the work scope. Before committing, confirm the current permit requirements with HDB and include the intended method in the renovation documents.
Adding a second toilet involves more than installing a WC. The work can affect plumbing, drainage, waterproofing and ventilation, so consider approval requirements before construction. For example, the proposed location may need new drainage connections or changes to existing services. Set out the intended layout and affected services, then establish the relevant approval steps before work starts. Do not assume a standard toilet renovation permit automatically approves a second toilet.
Divide the work into clear stages in the renovation plan. Record whether the contractor will remove existing finishes, install an overlay, alter plumbing or change the toilet layout. These details help identify which HDB requirements may apply. Keep approved scopes, permit records and revised drawings together. If the method changes after work begins, pause and resolve the approval implications before proceeding with the revised scope.
Use these checkpoints to keep the process orderly:
Identify whether the flat is within the three-year restriction period for removing original bathroom finishes.
Describe the proposed method, including hacking or an adhesive-only overlay over one existing layer.
Record overlay thickness, since the stated permit exemption applies up to 13mm.
List any changes to plumbing, drainage, ventilation or toilet location.
Confirm applicable requirements with HDB before work begins, and retain the relevant records.
These distinctions matter because a permit exemption for one overlay method does not establish approval for unrelated work. HDB requirements can depend on the existing finishes and proposed changes. A clear written scope gives everyone a common reference. Keep permit correspondence and approved plans with the renovation records so the completed work can be compared with the agreed method.
4. Commercial project testing and handover
For a commercial renovation or fit-out, agree on any required testing and inspection with the project team and building management before work begins. The test method and timing depend on the systems affected and the building’s requirements. Keep testing distinct from the final handover inspection: each serves a different purpose.
Before work is concealed or finishes are installed, confirm whether relevant systems need inspection or testing. Agree on the sequence, method and acceptance criteria with the project team and building management. Record the test date, results and any visible issues. If a test identifies a problem, document its location and arrange further investigation before the next stage proceeds.
Do not assume that one testing duration or method applies to every project. Confirm the requirements for the specific works and follow the instructions provided by the relevant parties. Record the actual method, duration and observations rather than relying on unverified examples such as 2.5cm of water for 4 hours, 24 hours or 2 hours.
At handover, check that agreed inspections and tests have been completed and that outstanding issues are recorded. Keep the test and inspection records with the project documents. Confirm the handover requirements with building management, as these may vary between premises.
Use a simple record for each test. Include:
The system or area tested and the date.
The test method and duration.
Photographs of the work and any accessible areas relevant to the inspection.
Any visible issues or changes during inspection.
Corrective work and the outcome of any repeat test.
Do not treat an unverified report of 2 chances to demonstrate compliance as a rule for commercial premises. If a test fails, document the result and arrange investigation with the relevant contractor and building management. A visible mark can help direct an inspection, but does not establish the cause by itself.
A passed test records the outcome under the conditions at the time; it does not guarantee that no issue will arise later. Keep test records alongside photographs, handover documents and repair notes. If signs of a problem emerge, these records can help the project team trace the sequence and identify areas for further inspection. Do not rely on unverified reports involving 2 years or a test 6 months earlier as guidance for a commercial project.
5. How should commercial renovation work be sequenced?
There is no single sequence for every commercial project. The order of work depends on the scope, site conditions and building management requirements. The schedule must allow each stage to finish and be checked before the next begins. A space that looks ready does not confirm that all preceding work is complete.
Start by identifying the project scope and building management requirements. The contractor should explain the work stages, dependencies and checks required before handover. Record these details in the work schedule, not only in a verbal update. For example, note when site preparation finishes and when the next inspection is planned.
Conditions at the premises can affect the work sequence. A late design change, an unforeseen site condition or a repair may require further preparation or work. If completed work is disturbed, address the affected area before following trades proceed. Set the next work date according to the required preparation and inspection steps, not the other way around.
Keep the stages clear:
Confirm the scope, site conditions and building management requirements.
Plan the work areas, trade sequence and access arrangements.
Complete each stage according to the agreed scope and schedule.
Inspect the work and complete the planned checks.
Proceed to the next stage after the checks are satisfactory.
Keep a simple record of each stage. Note the work dates, scope, areas completed and relevant instructions. Add dated photographs before later work conceals completed items. If an inspection identifies an issue, document its location and any repair. Allow the repaired area to complete its required checks before following trades proceed.
Do not treat an inspection as a substitute for completing the agreed scope. A check assesses the work under the inspection conditions, while proper sequencing allows each stage to be completed before it is covered or affected by later work. An inspection result also does not excuse incomplete work around service penetrations, junctions or edges. Check these details before the next stage begins.
Build coordination time into the renovation schedule. A change of scope, additional work or local repair can shift the planned dates. The contractor should explain the revised sequence and record the reason for the change. This helps avoid pressure to proceed before the specified work and checks are complete.
For a clearer sequence, share your renovation plan and discuss the work stages before scheduling begins.
JM & SONS General Contractor Pte Ltd
JM & SONS General Contractor Pte Ltd supports businesses planning commercial renovation and fit-out work. The HDB waterproofing checks in this guide are specific to residential toilets; for commercial premises, clear scopes, sequencing and records also help coordinate renovation work responsibly. JM & SONS can assist with commercial space planning, interior fit-out and project coordination, aligning the agreed scope with site requirements and the construction sequence. If you’re planning a commercial project and need to discuss its renovation scope, contact JM & SONS General Contractor Pte Ltd to start a conversation.
Make the next renovation decision with a clear scope
A well-planned HDB toilet renovation waterproofing project starts with decisions recorded before work begins. Keep the agreed scope, method and renovation records together so everyone involved can work from the same information. If questions arise during the project, those records provide a practical basis for discussing next steps.
The same attention to detail matters in commercial renovations, where scope and coordination shape the move from planning to construction. JM & SONS General Contractor Pte Ltd works on commercial fit-outs and office renovations in Singapore. For a commercial project, prepare any floor plan or site photos you have, along with a short note about the space and intended work. These details can help start a focused conversation.
If your plans involve a commercial renovation, contact JM & SONS General Contractor Pte Ltd to discuss your project. A clear first conversation is a practical way to move forward.
Frequently Asked Questions
Is a toilet kerb necessary in an HDB bathroom?
A kerb can help contain shower water, but its usefulness depends on the bathroom layout. Consider the doorway, floor levels, shower position and drainage together. For example, a kerb may not prevent water escaping if the floor slopes towards the entrance. Plan the kerb as part of the water-flow design rather than treating its height as proof that the bathroom is protected.
Is a waterproofing test mandatory for HDB bathrooms?
HDB requires a water test after bathroom floor finishes are replaced. This requirement concerns completed floor finishes, so it is distinct from a check carried out before tiling. Keep records for each test stage. If the renovation has a different scope, such as replacing fittings without replacing floor finishes, establish which requirements apply before planning the testing sequence.
What should you check before an HDB toilet renovation?
Before work starts, confirm the flat’s age, existing finishes and intended renovation method. Newly built HDB flats have a three-year restriction period for removing original bathroom and toilet wall and floor finishes. Also note whether the plan changes plumbing, drainage or the toilet layout. These details can affect the sequence, applicable approvals and what the renovation quotation needs to cover.
What are HDB rules for toilet waterproofing and bathroom renovations in Singapore?
HDB requirements depend on the work being carried out. Newly built flats have a three-year restriction period for removing original bathroom and toilet finishes. An adhesive-only overlay over one existing layer, up to 13mm thick, does not need an HDB permit under the stated conditions. Treat that exemption as specific to that method, and establish applicable requirements for other work with HDB.
Does HDB require a permit for toilet renovation or waterproofing works?
Some work may fall within a stated permit exemption, but the method and existing finishes matter. An adhesive-only overlay over one existing layer, up to 13mm thick, does not need an HDB permit. That does not establish an exemption for hacking, additional layers or changes to services. Describe the actual scope and check the applicable HDB requirements before work begins.
What is the required water ponding test duration for HDB toilet waterproofing?
HDB requires a water test after bathroom floor finishes are replaced, but no test duration is specified in the available requirement. A reported HIP test used a water depth of 2.5cm for 4 hours; that example is not a universal duration. Record the duration and conditions used for your project, and distinguish the required post-finish test from an earlier membrane check.
How can I check whether an HDB toilet renovation contractor is licensed and reliable?
Ask for the contractor’s relevant registration details and establish their status with the issuing authority. Reliability also depends on a clear written scope identifying waterproofing areas, renovation method, testing stages and supplied records. For example, dated photographs can show what was covered before tiling. Do not treat a verbal assurance or a passed test alone as evidence of every work detail.
How do cementitious, polyurethane, and liquid-applied waterproofing compare for HDB toilets?
Cementitious waterproofing is cement-based, while polyurethane is resin-based. Liquid-applied describes how a product is applied, not a single chemical type, so it can overlap with other categories. Compare systems by their coverage, preparation and curing instructions.

Comments